Privacy Policy
Cookie Preferences
We use cookies and other tracking technologies to improve your browsing experience on our website, show you personalised content, and analyse our website traffic. Privacy Policy

Do I need to use a SIM?
A SIM is not needed for surveys. It is only required when using Monitor Mode. The SIM used must be at least the same RAT (i.e. 2G/3G/4G) that you are looking to monitor, however it does not need to be on the same network. (The SIM card inserted will be able to pick up all available networks and will not be restricted to the network of the SIM).
Can I use my own SIM?
Yes, any SIM can be used as long as the pin code function has been removed. If you wish to use a micro or nano SIM, the SIM carrier provided must be used to make it the required size and ensure it fits into the device correctly.
I am running a survey but want to cancel?
While a survey is running you cannot cancel or complete any other actions, you must wait for the survey to complete or power off the device.
What is the difference between Battery Saver and Auto Turn Off?
Battery Saver puts the radio module into sleep mode and dims the brightness of the screen to save battery power. Auto Turn Off enables you to select a time, that if the unit is not in use, it will automatically power off to conserve battery power (as standard this is set to 5 minutes).
Why can’t I see all the networks? (in Single Network or Monitor Mode)
If you can’t see your preferred network try refreshing the network. After this refresh the networks available in your location will be displayed, if you still can’t see your chosen network it may be that it is not available in that area.
What do the icons mean?
If you are unsure what the function of an icon is you can use the Help Text function to display a description (press and hold the icon for 3 seconds).
My device appears to be performing slower than it used to. What is the cause?
If your Signal Analyser is close to reaching the maximum number of saved files (240) it takes longer to process tasks. By deleting old saved files you will reduce the amount of storage. Details can be found under the ‘DELETING SAVED FILES’ section in this guide. To view the storage space, go to:
Settings > Device Information ![]() (it will be shown within the storage space bar).
(it will be shown within the storage space bar).
Figure 1 - Signal Analyser Diagram
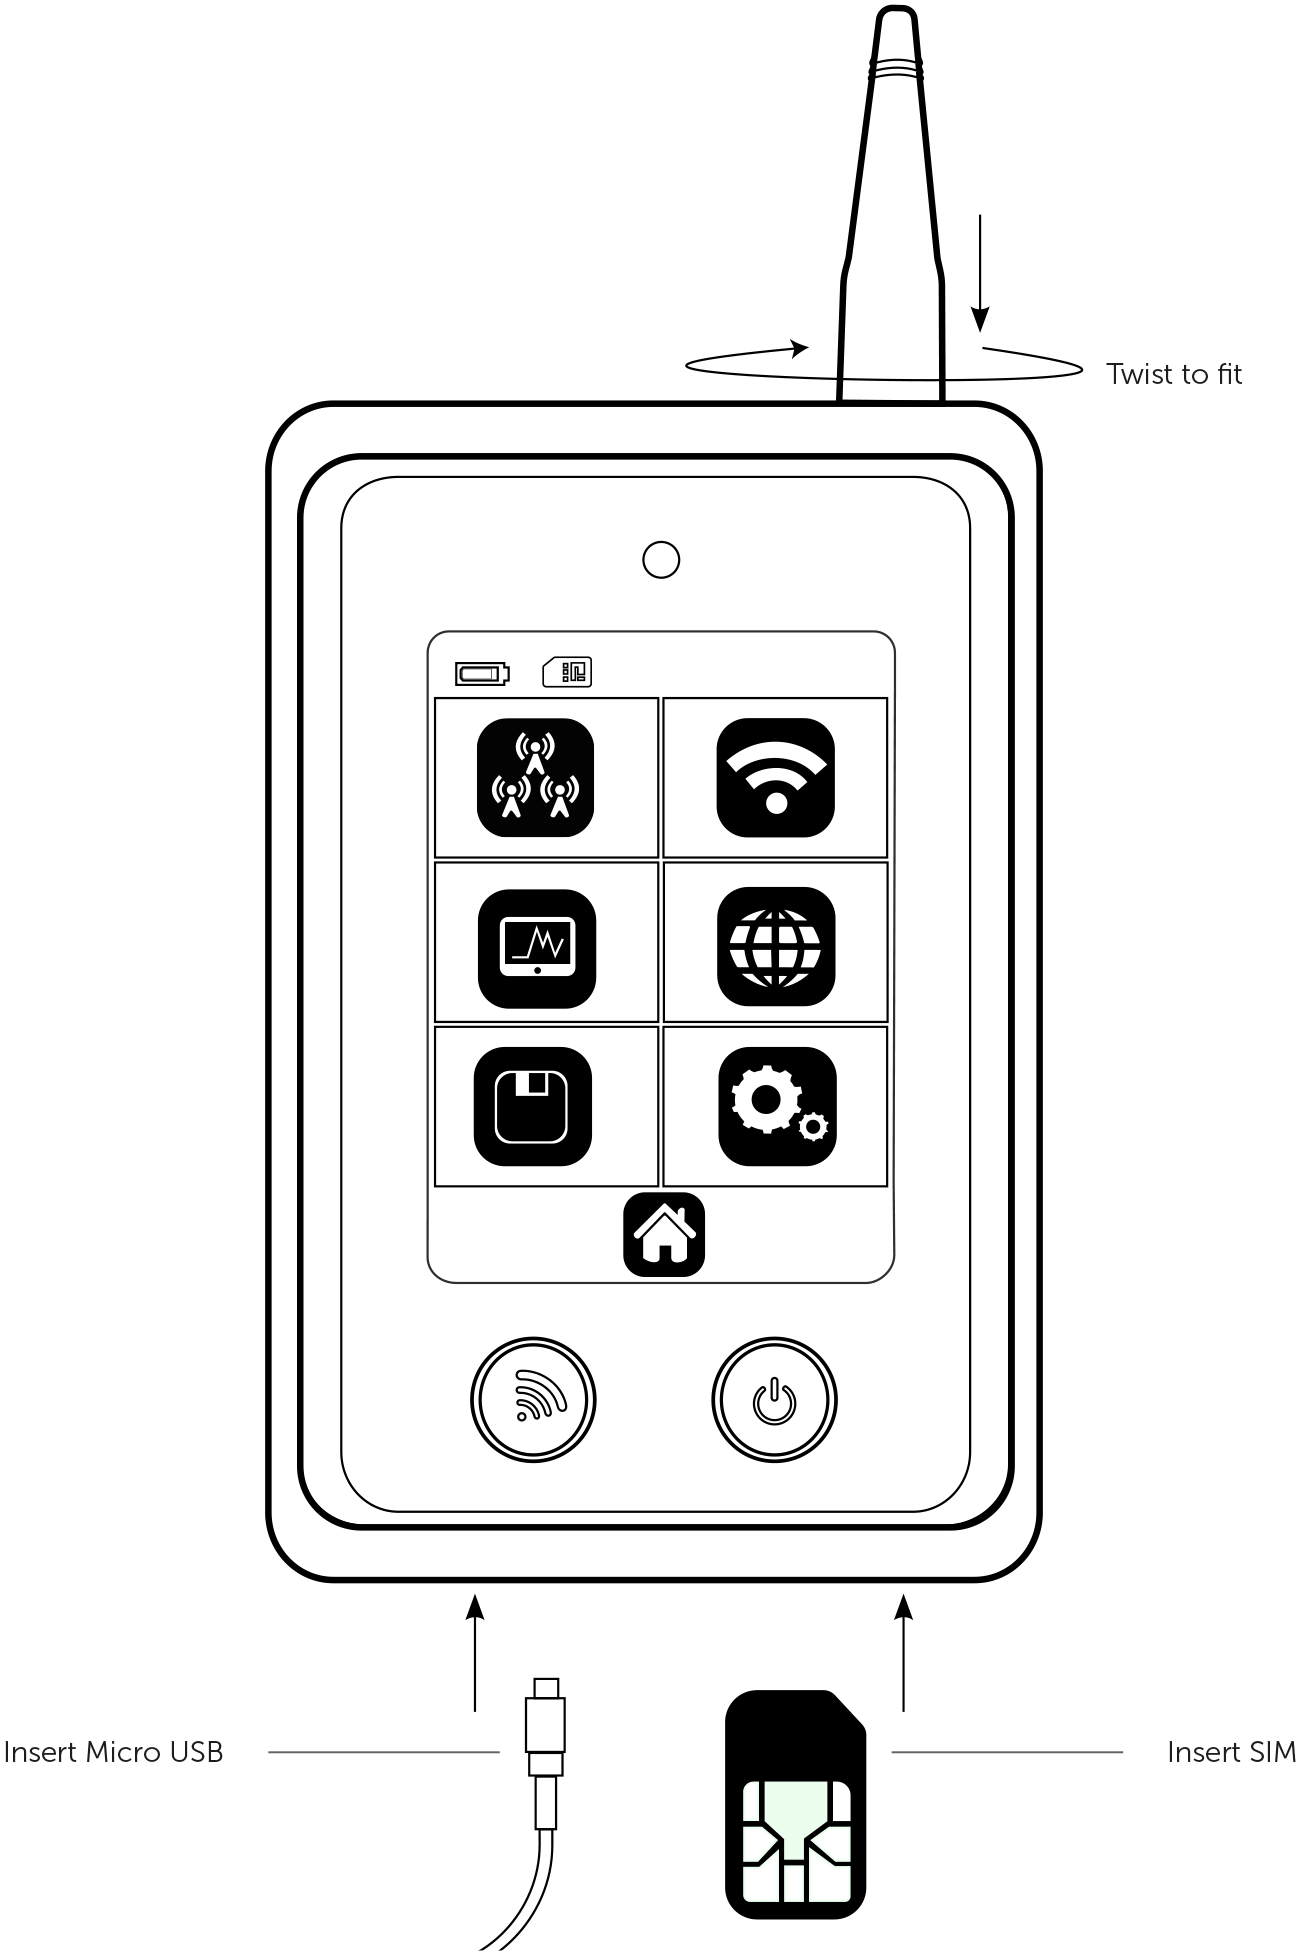
This section provides basic information to enable you to set up your Signal Analyser quickly
AERIAL
1. Connect the aerial on top of the device
POWERING UP YOUR DEVICE
1. Make sure the battery is fully charged using the Micro USB port on the bottom of the device (this typically takes 2 hours). The device will not operate correctly for surveys or monitoring while a USB is connected.
2. Once power is connected the device will turn on
The first ever power up may take 2-3 minutes as the unit will be doing a background network search to establish the available networks in your location
FITTING A SIM
A SIM is only required when using Monitor Mode and not when performing single or multiple network surveys
1. Ensure your device is powered down and insert the SIM into the SIM slot on the bottom right hand side of your Signal Analyser. To remove the SIM, use a pen to depress before detaching. When a SIM is inserted a SIM Icon will be displayed in the top left hand corner of the screen
If you wish to use a Micro/Nano SIM you will need to use the SIM carrier supplied
2. Place the SIM inside the carrier and push this into the SIM slot on the bottom right hand side of your Signal Analyser. To release use a pen to depress the SIM carrier and then detach
HELP TEXT
1. Press and hold (for 3 seconds) the icon you would like explaining. A pop up box will then show with the description
2. To close the pop up box press the X in the top right hand corner
Figure 2 - Help Text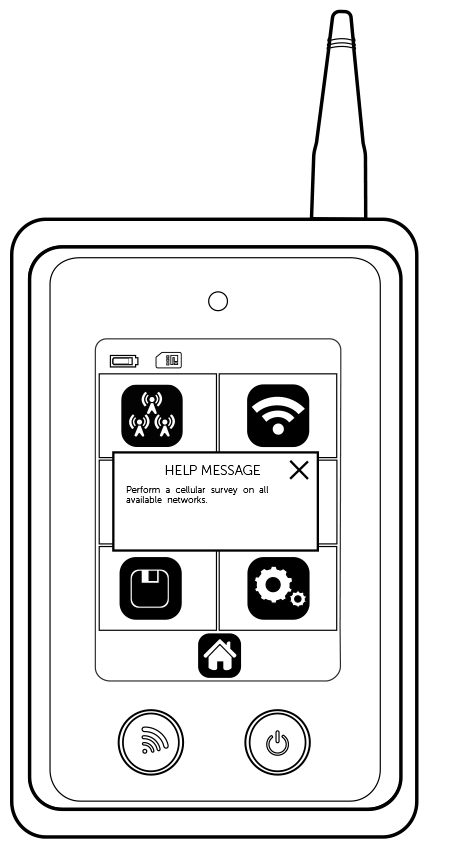
PERFORMING A SITE SURVEY
MULTI NETWORK SURVEY
1. Select the Cellular icon on the home screen ![]()
2. Select the Multi Network icon ![]()
3. Choose either 2G, 3G, 4G or all technologies (for the 2G variant the technology will be limited to 2G only)
4. Select the Start icon ![]() for the survey to begin. If you wish to name the survey before you start select the Name Survey icon, name your survey
for the survey to begin. If you wish to name the survey before you start select the Name Survey icon, name your survey ![]() and press Go
and press Go ![]()
5. A Survey Progress bar will then display the status of your survey. The survey should take 2-3 minutes
6. Once the survey has been completed the results will be available
SINGLE NETWORK SURVEY
1. Select the Cellular icon on the home screen![]()
2. Now select Single Network icon ![]()
3. Choose either 2G, 3G, 4G or all technologies (for the 2G variant the technology will be limited to 2G only)
4. Select the required network (if you can’t see your preferred network press refresh so that the unit locates all available networks in the area). You can also select Any Network option which allows the radio module to decide which is best for your location.
Refreshing networks may take 2-3 minutes
5. Select the Start icon ![]() for the survey to begin. If you wish to name the survey before you start select the Name Survey icon, name your survey
for the survey to begin. If you wish to name the survey before you start select the Name Survey icon, name your survey ![]() and press Go
and press Go ![]()
6. A survey progress bar will then display showing the progress of the survey. The survey should take 2-3 minutes
7. Once the survey has been completed the results will be available
RESULTS
TOP NETWORKS
Shows the highest signal strength readings for each available network in your location; up to 5 networks will be displayed (if available). Press the right arrow to enter the Best Cells section.
BEST CELLS
Shows the highest signal strength readings across all technologies and networks in your location; up to 5 cells will be displayed (if available). Press the right arrow to enter the Cell Properties section.
CELL PROPERTIES
Shows basic information for each cell. To view advanced information press the screen in the appropriate area. See below for more information. If further results are available use the down arrow to view these
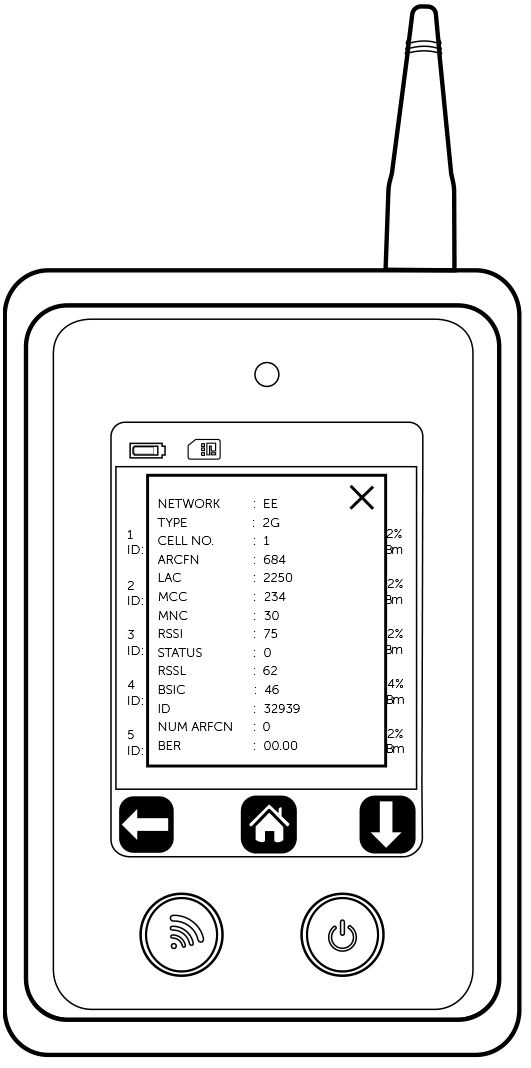
ADVANCED CELL PROPERTIES
| PARAMETER | DESCRIPTION | TECHNOLOGY |
| Network | The network to which the cell belongs | 2G, 3G, 4G |
| Type | The radio technology | 2G, 3G, 4G |
| Cell Number | The cell number you are investigating | 2G, 3G, 4G |
| ARFCN | The cell carrier assigned radio channel (BCCH - Broadcast Control Channel) | 2G |
| BSIC | Base Station Identification Code | 2G |
| RSSI (RxLev) | Reception Level (in dBm | 2G, 3G, 4G |
| BER | Bit Error Rate (in %) | 2G |
| MCC | Mobile Country Code | 2G, 3G, 4G |
| MNC | Mobile Network Code | 2G, 3G, 4G |
| LAC | Location Area Code | 2G, 3G |
| CELLID | Cell Identifier | 2G, 3G |
| Cell Status | Cell status; Outputs [suitable, low priority based on the received system information, forbidden, barred based on the received system information, low level, unknown] | 2G, 3G, 4G |
| NUMARFCN | Number of valid channels in the Cell Channel Description | 2G |
| ARFCNN | ARFCN of a valid channel in the Cell Channel Description | 2G |
| NUM CHANNELS | Number of valid channels in the BCCH Allocation list | 2G |
| BAN | The ARFCN of a valid channel in the BA list | 2G |
| SCR CODE | Scrambling Code | 3G |
| RSCP | Received Signal Code Power - RSCP level (in dBm) | 3G |
| ECIO | EC/IO ratio level (in dB) | 3G |
| BW | Bandwidth (in MHz) | 4G |
| TAC | Tracking Area Cod | 4G |
| UARFN | The cell carrier frequency designated by UTRA Absolute RadioFrequency Channel | 3G |
| EARFCN | Cell carrier frequency designated by EUTRA Absolute RadioFrequency Channel Number | 4G |
| PHY CELL ID | Physical Cell ID | 4G |
| RSRP | Reference Signal Received Power | 4G |
| RSRQ | Reference Signal Received Quality - RSRQ level (in dBm | 4G |
Figure 3 - Cell Properties
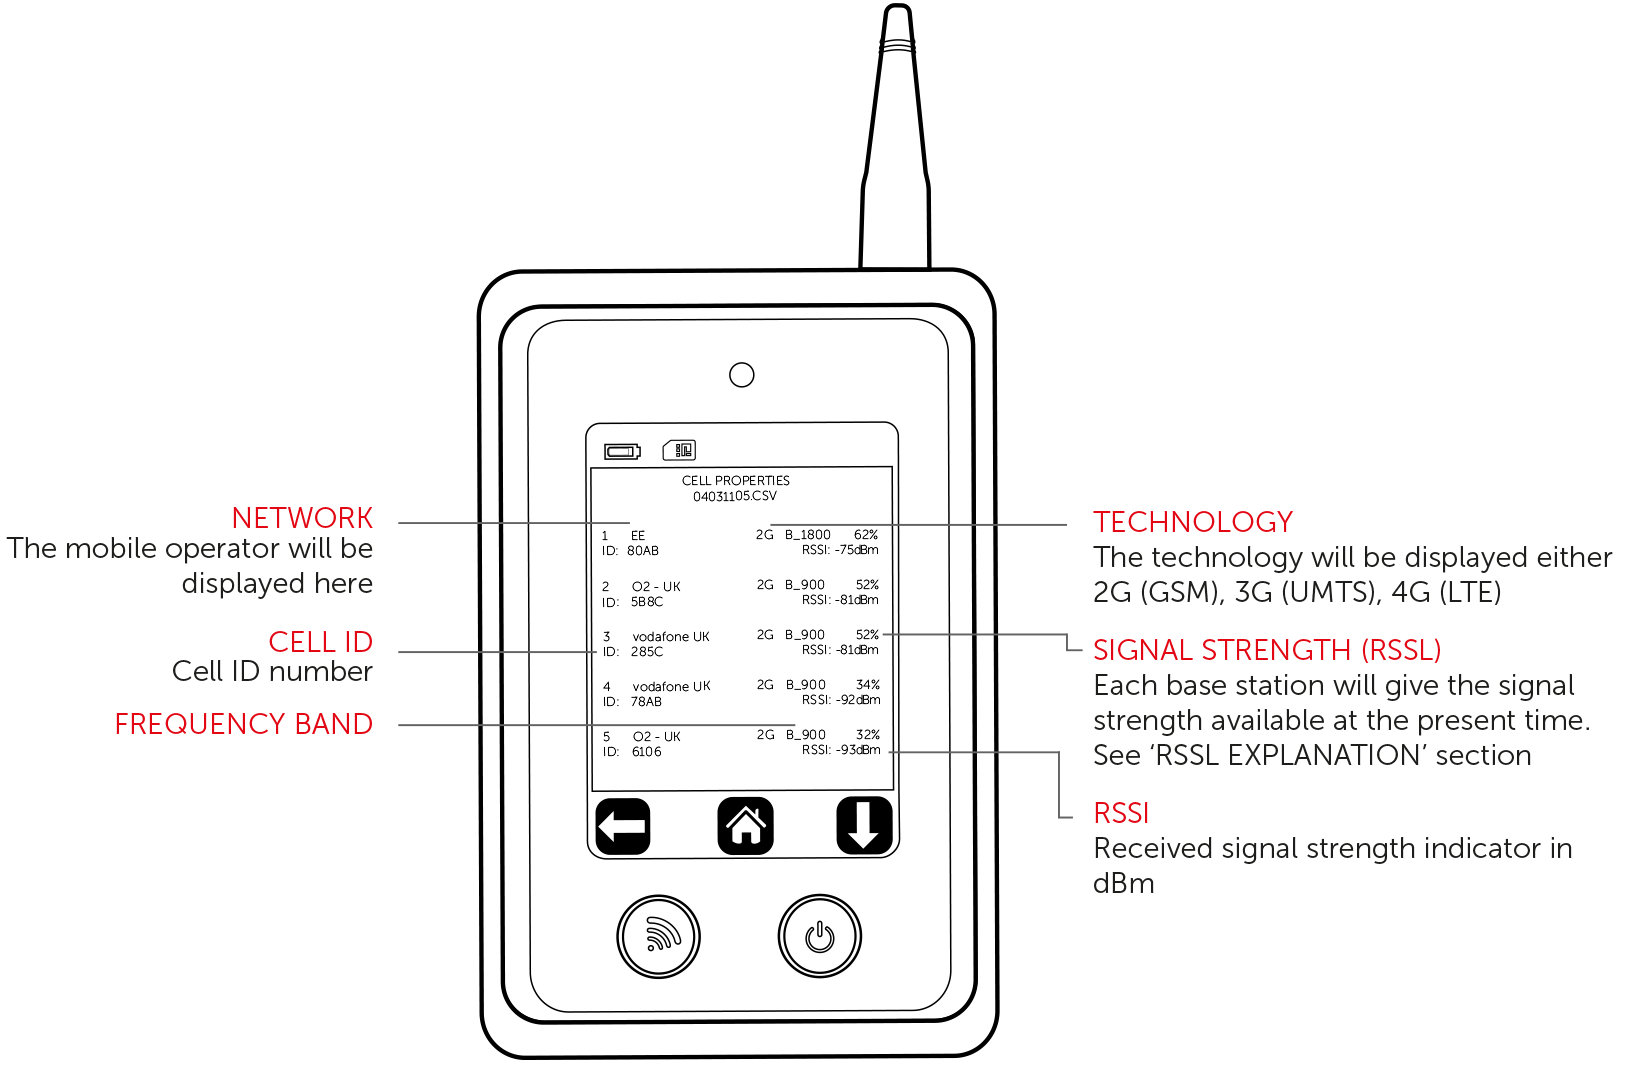
Figure 4 - Advanced Cell Properties
PERFORMING A SITE SURVEY
WI-FI SURVEY
1. Select the Wi-Fi icon on the home screen ![]()
2. Select the Start icon ![]() for the survey to begin. If you wish to name the survey before you start select the Name Survey icon, name your survey
for the survey to begin. If you wish to name the survey before you start select the Name Survey icon, name your survey ![]() and press Go
and press Go ![]()
3. A survey progress bar will then display, showing the progress of the survey. The survey should take 5-10 seconds
4. Once the survey has been completed the results will be available
RESULTS
TOP SSID
Shows the highest signal strength readings for each available SSID in your location and the number of Access Points (APs); up to 5 networks will be displayed (if available). Press the right arrow to enter the Best Access Points section.
BEST ACCESS POINTS
Shows the Best Access Points for your location and the channel number. Press the right arrow to enter the Access Point section.
ACCESS POINT PROPERTIES
Shows basic information for each SSID. To view advanced information, press the screen in the appropriate area.
See below for more information. If further results are available use the down arrow to view these.
| PARAMETER | DESCRIPTION |
| SSID NAME | Wi-Fi network name |
| ENCRYPTION | Wi-Fi security protocol |
| MAC | Media Access Control (device identifier) |
| RSSI | Received Signal Strength Indicator (in dBm) |
| SIG | Signal Strength (%) |
| FREQ OFFSET | Frequency Offset of Access Points |
| FREQ CALIB | Calibration for Frequency Offset |
| CHN | Channel |
MONITOR MODE - CELLULAR
1. If you are performing Monitor Mode on 4G, ensure a SIM card is inserted as per the ‘FITTING A SIM’section. The SIM card used must be the technology required or higher e.g. 4G is capable to performMonitor Mode for 4G, 3G and 2G. The SIM does not need to be for the same network provider youwish to monitor
2. Select the Monitor Mode icon ![]()
3. Select the Single Network icon ![]()
4. Choose either 2G, 3G or 4G or any network (for the 2G variant the technology will be limited to 2G only)
5. Select the required network (to ensure all available networks are displayed press refresh)
Refreshing networks may take 2-3 minutes
6. Live Monitor Mode will now run
MONITOR MODE RESULTS - CELLULAR
Figure 5 - Monitor Mode

MONITOR MODE SNAPSHOT
1. Ensure Monitor Mode is running
2. Press the Snapshot icon![]()
3. The rename survey option will automatically display, name the survey then press Go ![]() to save. A file will now be created, but can only be viewed in a table format on your laptop/PC (you will notsee a graph)
to save. A file will now be created, but can only be viewed in a table format on your laptop/PC (you will notsee a graph)
MONITOR MODE - WI-FI
1. Select the Monitor Mode icon ![]()
2. Select the Wi-Fi icon 
3. Choose either SSID, Channel, MAC, Connect
SSID
Live Monitor Mode will run on a specific SSID
1. Select the SSID icon ![]()
2. Choose the SSID you wish to monitor (to ensure all available SSIDs are displayed press refresh)
3. Live Monitor Mode will now run
CHANNEL
Live Monitor Mode will run on a specific channel
1. Select Channel icon ![]()
2. Choose the channel you wish to monitor
3. Live Monitor Mode will now run a list of Access Points (APs) per channel which will be displayed via atable. Push any channel with APs present to view the SSIDs and signal strengths (in dBm)
MAC
Live Monitor Mode will run on a specific MAC address
1. Select MAC icon ![]()
2. Select the MAC address you wish to monitor
3. Live Monitor Mode will now run
CONNECT
Connect to a specific SSID and run live Monitor Mode
1. Select the connect icon ![]() and it will constantly signal Google to provide you with ping times in ms
and it will constantly signal Google to provide you with ping times in ms
2. Select the SSID you wish to connect to
3. Enter the password for the SSID you have selected
4. Live Monitor Mode will now run
MONITOR MODE - SAVE RESULTS
1. Ensure Monitor Mode is running
2. Press the Save Results icon ![]()
3. The Rename Survey option will automatically display, name the survey then press Go ![]() to save. A file will now be created, but can only be viewed in a table format on your laptop/PC (you will not see a graph)
to save. A file will now be created, but can only be viewed in a table format on your laptop/PC (you will not see a graph)
Figure 6 - Wi-Fi monitor when SSID, MAC and Connect options are selected
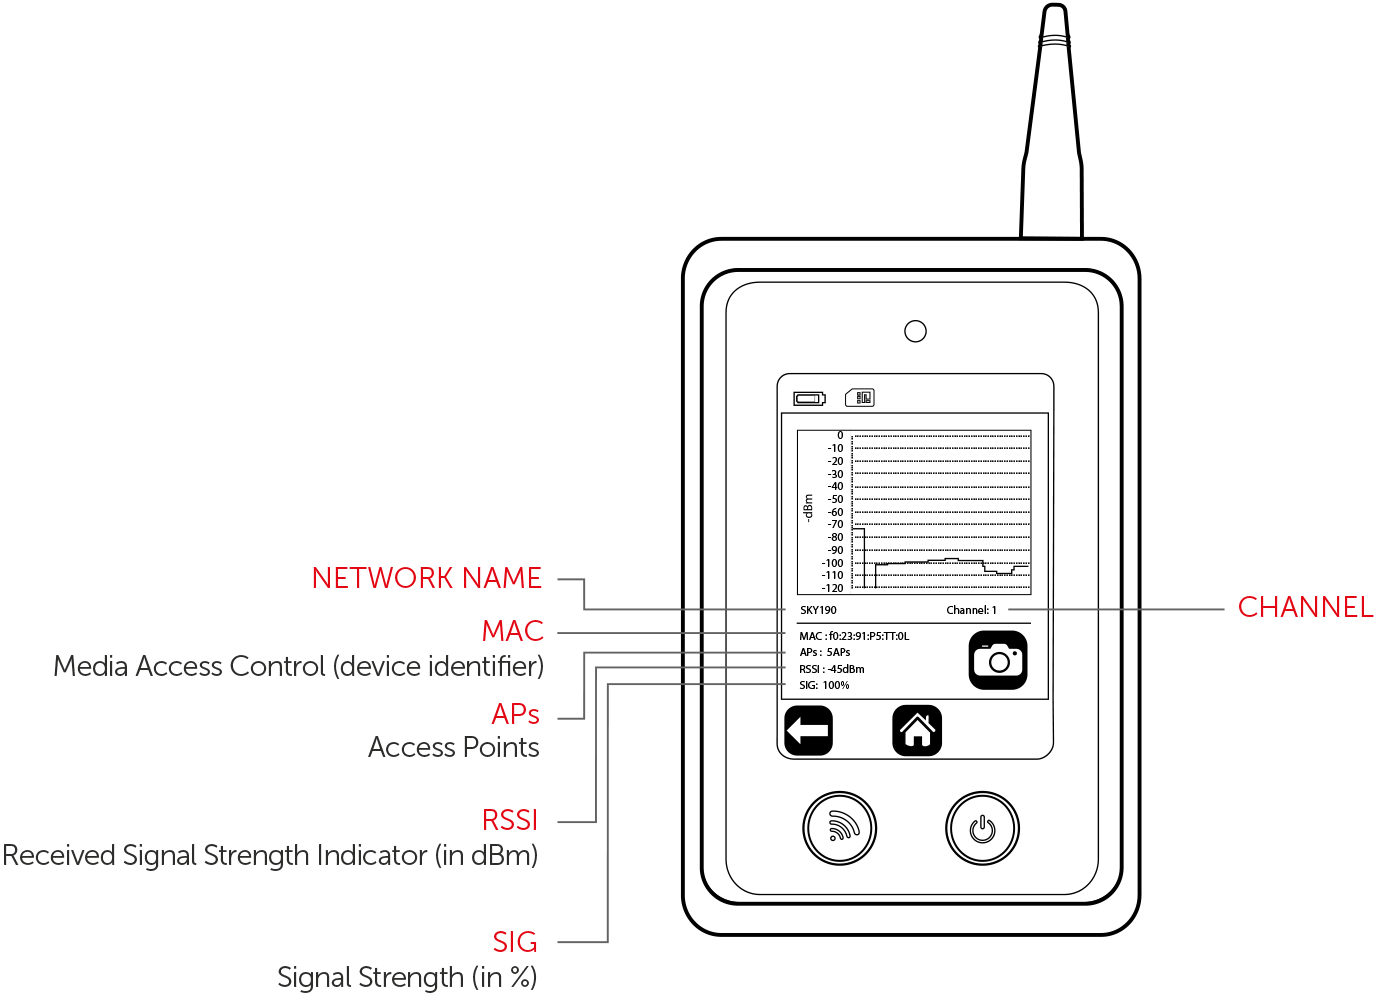
Figure 7 - Wi-Fi monitor when the Channel option is selected

SAVED FILES
1. Select the Saved Results icon ![]() . Results will be shown in descending order by time
. Results will be shown in descending order by time
2. Then select either the Multi Cellular icon ![]() or Wi-Fi
or Wi-Fi ![]() . Results will be shown in descending order by time
. Results will be shown in descending order by time
3. Select the file you wish to view. Results will now be shown in the same format as per the ‘RESULTS’ section
DELETING SAVED FILES
1. Select and hold the file you wish to delete. A Delete icon ![]() will now show in the top right hand corner
will now show in the top right hand corner
2. Press delete. This file has now been deleted
SAVED FILE DOWNLOAD
1. Ensure the Signal Analyser is switched on
If the device is switched off and connected to the USB port on a PC/Laptop this will
charge the device only
2. Connect Signal Analyser via a USB lead to your PC/Laptop
3. Once connected click on Start then select Computer. The Signal Analyser files will be shown under devices with removable storage
4. Select Analyser
5. Select the applicable folder (Cellular Snapshot, Cellular Survey , Wi-Fi Snapshop and Wi-Fi survey) and your results will be displayed as a CSV file.
6. These files can now be moved to your required folder or displayed as a CSV file.
You cannot read/write files and run a survey while the Signal Analyser is connected to
the USB port, this may cause the unit to crash
SETTINGS
Enter the settings menu
| ICON | DESCRIPTION | FUNCTION |
| Brightness Icon |
Adjust brightness | Increase/decrease brightness |
Languages Icon  |
Change device language | Select language |
| Time Icon |
Set time/date | Set time/date |
| Auto-Off Icon |
Define how long the device stays powered onwith no action | Set auto-off time |
| Default Survey Icon |
Define which survey the quick survey button on the front of the device executes | Select survey |
| Sounder Icon |
Turn sound on/off | Turn sound on/off |
Power Save Icon  |
Power saver to send radio module to sleep | Turn power save on/off |
| Device Information Icon |
View firmware version | View firmware version,Radio module, Radiofirmware, IMEI, SIM status |
| Factory Reset Icon |
Restore factory defaults | Complete a factory resetback to default settings |
RSSL EXPLANATION
To ensure that a consistent approach is used to all Radio Access Technologies (RAT) - such as 2G, 3G and 4G - a new, more accurate method for calculating percentage of the signal strength has been introduced. The RSSL is not based on CSQ readings alone provided by the radio module, but is calculated from the raw data received from the network readings. The value is mapped through the whole range and is consistent across each RAT. The value calculation includes both signal strength and signal quality measurements.
The example of such mapping for a 3G cell is:
RSCP: -80 dBm
RSRQ: -4 dB
CSQ: 19
ECIO: 12
SPECIFICATIONS
| Model | CS2389 2G/GSM, 3G/UMTS, 4G/LTE |
| Dimensions | 172mm (h) x 72mm (w) x 20mm (d) |
| Weight | 149g including aerial |
| Temperature | -20°C to + 60°C transit, -4°C to +40°C operating |
| Humidity | 0-80% non-condensing |
| Warranty | 2 years |
| Radio Technology | GSM, UMTS, LTE, Wi-Fi 2.4Ghz (depending on version) |
| Battery | 3.7 Volt 1000mAh |
| Charger | 5 Vdc micro USB plug-top charger or equivalent |
FREQUENCY BAND
| PART NUMBER | CS2369 | CS2379 | CS2389 |
| 4G Bands (MHz) |
• |
• |
• |
| 3G Bands (MHz) |
• |
900 (B8) 2100 (B2) |
• |
| 2G Bands (MHz) | 850 (B5) 900 (B8) 1800 (B3) 1900 (B2) |
900 (B8) 1800 (B3) |
• |
| Wi-Fi |
• |
• |
2.4Ghz |
CERTIFICATIONS
International Radio Approval
The CS2389 Signal Analyser incorporates an independently tested and approved 4G/3G/2G radio module that meets the requirements of European radio communication standards
Approval Authority: CE1909![]()
SUPPORT
For more information on the Signal Analyser or other CSL products please contact
CSL Technical Support:
UK Tel: +44 (0)1895 474 444
Ireland Tel: 1800 855 695
Email: support@csl-group.com
Hours: 08.30 to 18.00 weekdays, 10.00 to 16.00 Saturday