
Guide
INTRODUCTION
|
WHEN COMPLETING AN UPGRADE OR REPLACEMENT ON AN EXISTING INSTALLATION, PLEASE ENSURE YOU ALWAYS USE THE AERIAL SUPPLIED WITH THE NEW DEVICE. THIS WILL ENSURE THE BEST MOBILE SIGNAL FOR YOUR INSTALLATION. SOME OLDER AERIALS DO NOT PROVIDE ACCESS TO 4G AND IF USED, COULD LEAD TO SIGNAL-RELATED ISSUES AND FAILURES. |
In order to ensure your DualCom Pro achieves the best possible signal available we encourage you to complete the following steps.
Step 1 - Use a Signal Analyser to determine the optimum location for the aerial/s and follow the advice from the Signal Analyser section below.
Step 2 - If you do not have a Signal Analyser, power up the DualCom Pro, connect the aerial/s, go through the commissioning process and check the signal strength before permanently fitting the aerial. We recommend a signal strength on the DualCom Pro of at least 3 (30%)
or above.
|
STEPS 3 & 4 ARE ONLY IF YOU ARE FITTING A DUAL RADIO AERIAL. PLEASE SKIP TO STEP 5 IF YOU ARE FITTING A SINGLE RADIO AERIAL. |
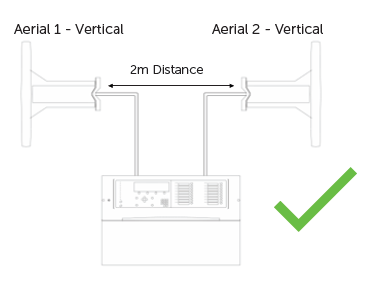
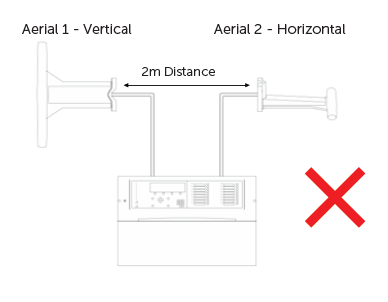
Step 3 - If you are using a dual radio product, make sure that both aerials are at least 2 metres apart.
Step 4 - If using a dual radio product, position the aerials in a vertical orientation.
Step 5 - Keep your devices aerial/s cables away from high voltage cables or any other aerial cables.
Step 6 - Keep your aerial/s in open space and 1 metre away from large metal objects or sources of interference (i.e. wiring, lighting, electrical installations, computers, control panels, fuse boards, routers, etc.)
Step 7 - Do not tightly coil any excess aerial cable. Try and make large loops if possible.
See below for examples of good and bad single & dual aerial set-ups.
Figure 1 - Single Aerial Installs Good & Bad
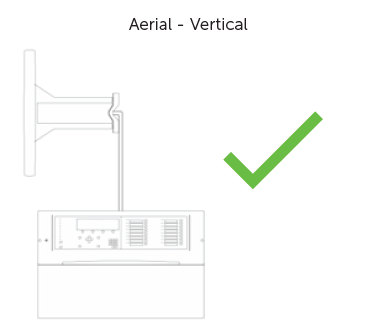

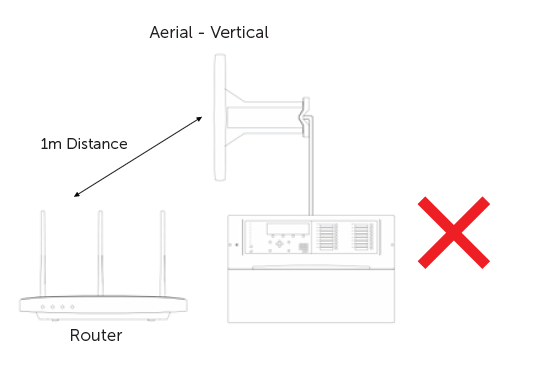
Figure 2 - Dual Aerial Installs Good & Bad
CSL SIGNAL ANALYSER - CS2389
Using the Signal Analyser, you must ensure that there are enough base stations (2 or more) available at the site and that they can supply sufficient signal strength (30% and above). This device will help determine the optimum location for the DualCom’s aerials to be mounted.