

Panel Connection – RS232 connection via ATS7090 board
| Manufacturer | Carrier |
| Model | ATS |
| Version | Advanced |
| Minimum DualCom Pro Firmware | DualCom Pro 2: v2.1.14 and ATS7090 version 2.02 or later. |
| Minimum Panel Firmware | All versions greater and equal to 026.026.0141-0143 |
| Cable required? |
|
| Panel Profile | ARITECH-ADVANCED-ATS7090 |
| Panel Bus Connection | RS232 |
| Technical Notes | When configuring the panel with a laptop, disconnect the ribbon cable between the Panel and DualCom Pro 2 before connecting the Laptop. When finished, you must disconnect the laptop and then reconnect the ribbon cable. ATS7090 Peripheral MUST be situated on AUX3. |
IMPORTANT:
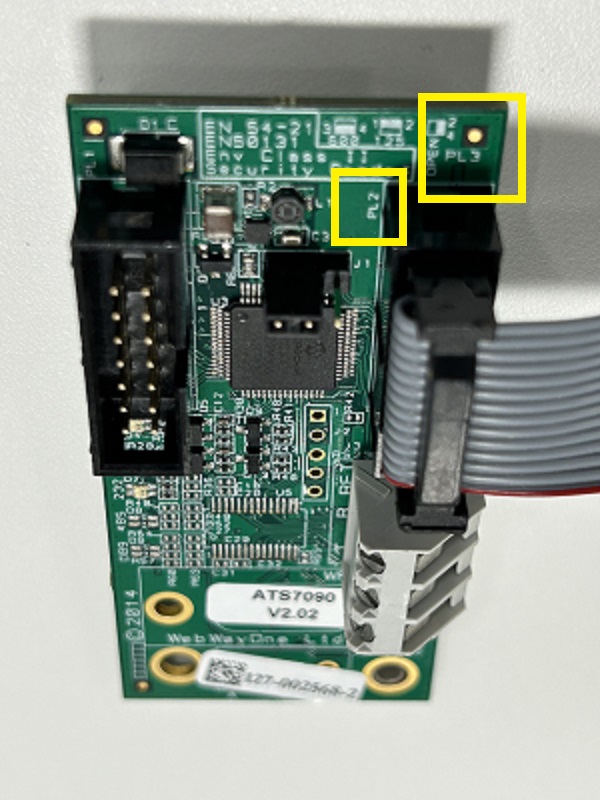
- The ribbon cable should be connected to PL3 on the ATS 7090 board (the one next to the RS232 terminals).
- The link on jumper on J1 of the ATS7090 board should be connected to the two pins furthest away from PL3.
The ribbon cable should be connected to the connector next to the RS232 terminals with the jumper on two pins farthest to the ribbon cable.
- ATS7090 TX -> RX CSL Pro2
- ATS7090 RX -> TX CSL Pro2
- ATS7090 RET > RTN CSL Pro2

Panel Programming
- Enter ‘Dialler’ menu [9]
- Enter ‘CS 1’ menu [1]
- Enter ‘Transm Path’ menu [2]
- Select Option [‘TDA75XX’]
- Enter ‘Protocol’ menu [3]
- Select option [‘(X)SIA’]
- Enter ‘Accounts’ menu
- Select ‘Area N’ with [account numbers]
- Enter [Mode] menu
- Select option ‘Primary [CS]
- Enter ‘Protocol Opt’ menu [8]
- Enter [(X)SIA] menu
- Set ‘Area Modifier' to [ON]
- Set ‘Name Chars’ to [30]
- Set ‘Event Number’ to [3 digits]
- Set ‘Subev Codeing [to ‘Decimal]
- Set [SIA Frequency] to [Bell]
- Go back to [Dialler] menu level
- Enter ‘Path Options’ menu [3]
Enter ‘Path Options’ menu [3]
- Enter ‘PSTN’ menu [1]
- Enter ‘Line Fault’ menu and select option [No]
- Go back to ‘Path Options’ menu level.
- Enter ‘IP’ menu [4] If present
- Enter ‘Line Fault’ menu and select option [No]
- Go back to 'Path options' menu level
- Exit Installer (Engineer) mode
- Enter 'TDA75XX' menu [7]
- Enter 'Line Fault' menu and select option 'If used'
- Go Back to Installer Menu level and select Menu 8: Sys Opt > 7: Panel & AB Opts > 9: Remote Config - YES
- Exit Installer (Engineer) mode
Technical Notes
- May require full panel and DC Pro power cycle
- User Code: Menu 8:2:1 - Need Acc [YES]
- The Area Account in the Alarm Events. This might need to be adjusted in the Panel's Settings in order to have a specific Area Number not a generic Account Number [Example: Area 1 - 0001, Area 2 - 0002, etc.....]