

Panel Connection – RS232
| Manufacturer | DSC |
| ModelS | Power Series PC1616, PC1832, PC1864 |
| Version | |
| Minimum Panel Firmware | |
| Cable required? | CSL Cable CS.1.207 |
| Panel Profile | DSC-PC-RS232 |
| Panel Bus Connection | RS232 |
| Technical Notes |
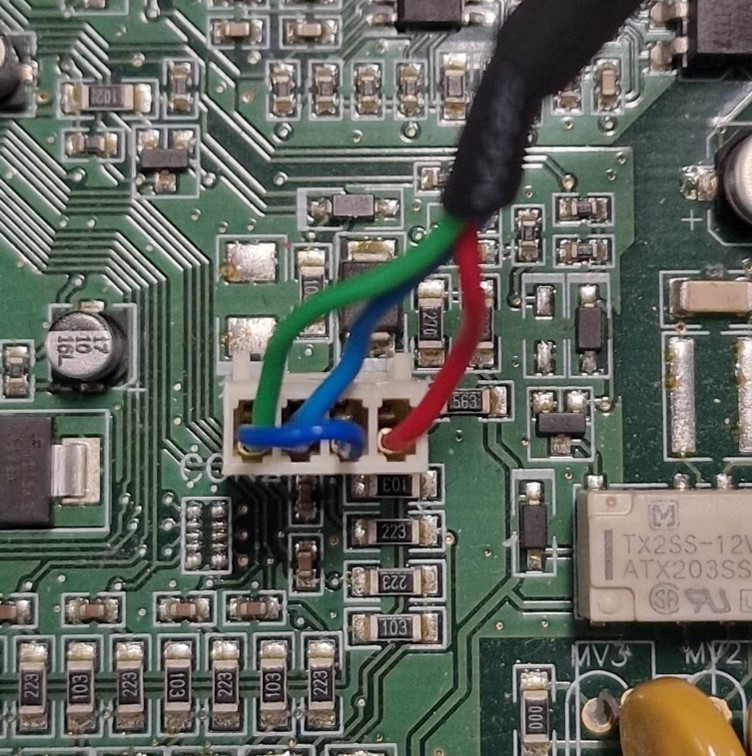
DualCom Pro to Panel Wiring
|
RS232-R |
Red |
PC-LINK (CON2) Pin 4 |
|
RS232-T |
Green |
PC-LINK (CON2) Pin 1 |
|
RTN |
Blue |
PC-LINK (CON2) Pin 2 |
Panel Setup
- Login in as Engineer and set-up via keypad:
- Press *8
- Keypad displays ‘Enter Your Installer Code’ >
- Press 5555
- Keypad displays ‘Enter Section’ >
- Press 015 to disable telephone line monitoring
- Keypad displays ‘Toggle Option’ and digits for those that are enabled
- Ensure 7 is disabled by pressing the number if it is showing
- Ensure 8 is enabled again by pressing the number if it is not showing
- Press #
- Press 301 First Telephone Number and programme to use TLink to route calls
- Keypad displays a series of characters
- Ensure first four read ‘DCAA’ followed by all Fs
- Press * to switch to letter mode
- Enter 1 for A, 2 for B, 3 for C, 4 for D and 6 for F, using the arrow keys to select the value to replace
- Press #
- Press 302 Second Telephone Number and fill all with F to disable
- Press 350 to configure panel to send SIA codes
- Keypad displays ‘Enter Data’
- Press 04 then a moment later 04 again
- Press #
- Press 380 DACT Communicator
- Ensure options 1 and 8 are enabled and others are all disabled
- Press #
- Press 381 SIA Sends Automatic Reporting Codes
- Ensure option 8 is enabled and 3 is disabled
- Press #
- Press 382 Call Waiting Cancel
- Ensure option 5 and 8 are enabled and all others are disabled
- Press #
- Press 401 Remote Programming – set this up if you require UDL
- Ensure option 1 and 8 are enabled and all others are disabled
- Press #
- Press # once more to exit engineering mode and save programming changes